
Appetizer Recipes-seeAmus Bouche-one bite appetizers below
________________________________________
Appetizer Recipes on this page include:
Artichoke and Parmesan Pyllo Appetizers
Artichoke and Parmesan Pyllo Appetizers
Bacon and Deviled Eggs
Brie
Brie in Puff Pastry & Mango, Brie & Port in Puff Pastry
Butternut squash in Puff Pastry
Cheese Puffs-Parmesan cheese puffs
Chicken Nuggets-Breaded in panko and oven baked
Corn off the Cob & Parmesan in Phyllo pastry
Brie
Brie in Puff Pastry & Mango, Brie & Port in Puff Pastry
Butternut squash in Puff Pastry
Cheese Puffs-Parmesan cheese puffs
Chicken Nuggets-Breaded in panko and oven baked
Corn off the Cob & Parmesan in Phyllo pastry
Crab Cakes with Dill Relish and Lime
Crab Puffs
Dumplings-steamed dumplings-Dim Sum
Egg Rolls
Fried Wontons
Dumplings-steamed dumplings-Dim Sum
Egg Rolls
Fried Wontons
Fruit Appetizer, with fancy cheeses & sage honeycomb
Grape Leaves, stuffed
Guacamole
Grape Leaves, stuffed
Guacamole
Parmesan Crackers
Pizza-Gluten Free Mini Pepperoni Pizzas
Pizza-Gluten Free Mini Vegetarian Pizzas
Proscuitto wrapped around brie and orange supremes
Shrimp Cocktail
Shrimp Cocktail in Phyllo
Spatzle-a dumpling, a Hungarian treat
Pizza-Gluten Free Mini Pepperoni Pizzas
Pizza-Gluten Free Mini Vegetarian Pizzas
Proscuitto wrapped around brie and orange supremes
Shrimp Cocktail
Shrimp Cocktail in Phyllo
Spatzle-a dumpling, a Hungarian treat
Super Easy Olive Dip
Vegetable Tower
________________________________________________________________
Today’s Recipe: we're always adding new things, please check back
Guacamole

Ingredients:
3 avocados, preferably with thick skins
1/2 cup + 1 tbsp mayonnaise
1/4 tsp garlic powder
1/2 tsp salt
1/4 tsp fresh pepper
1/2 tsp Dill
1/2 tsp Dill
1 tsp avocado oil (optional)
2 tbsp Cholula hot sauce (optional), not too hot, or your favorite hot sauce
3 avocados, preferably with thick skins
1/2 cup + 1 tbsp mayonnaise
1/4 tsp garlic powder
1/2 tsp salt
1/4 tsp fresh pepper
1/2 tsp Dill
1/2 tsp Dill
1 tsp avocado oil (optional)
2 tbsp Cholula hot sauce (optional), not too hot, or your favorite hot sauce
 Cut the avocados lengthwise all around using the pit as a guide.
 Twist the avocado a little and separate as shown.

 Using a chef's knife, hit the pit, a little hard, it will easily stick in. Twist the knife turning the avocado, and pull the knife and the pit out easily.
 Wash and save the avocado pits.

 Mash with an old fashioned masher or fork. I prefer it mashed, but not completely smooth. I like the pieces of larger avocado in it. You could also just cut into chunks and serve it that way too.

 Add in mayonnaise, oil and herbs.
 Try Growing your own avocados. Now this will take years to get the tree big enough, but we did this years ago on a whim, and now it's a 25 foot tree in our back yard.
 Take 2 wooden skewers and stick into the pit on each side as shown. This will not be hard. Place over a bowl of water, making sure part of it is touching the water. Wait a few days until a root comes out of the bottom, and then it's ready to plant. That's it.
__________________________________________________________________________
Amuse Bouche-tiny 1 bite appetizers
_______________________________________
Recipes on this page include:
Butternut Squash Consomme
Crab Puffs
Dumplings-steamed dumplings, dim sum
Proscuitto wrapped around brie and orange supremes
Dumplings-steamed dumplings, dim sum
Proscuitto wrapped around brie and orange supremes
Super Easy Olive Dip
Sushi
________________________________________________________________
Artichoke and Parmesan appetizers-one of my favorites

 To make the filling, you will need 1 jar of artichoke hearts, 1/2 cup mayonnaise, and 1 cup of grated Parmesan.
  I use a Cuisinart to chop up the artichoke hearts, but if you prefer, they can be fine chopped with a knife.
 Mix up all ingredients in a mixing bowl.
 Spread into an 8 inch square pan or an 8 inch cake pan. Bake for 25 minutes for the square pan and 30-35 minutes for the round cake pan. Bake at 350 degrees F.
 It should be golden brown when done. This is great just as it is, perhaps not that pretty, but the taste will win you over.
 Place into a bowl, and use a paper towel to absorb some of the excess oil.
 Prepare a baking sheet with either a silpat (silicone baking sheet), my favorite, or spray with a cooking spray.
 Next you will need a basting brush, 2-4 tbsp of butter or margarine and a package of Phyllo dough from your grocery freezer section. These are thin crispy pastry sheets.
 This is the pyllo dough. Keep the portion of the phyllo that you aren't using at this moment rolled up, or covered with a clean damp towel. I like to use a pizza cutter to cut my strips, it works best, but a knife is fine too.
  Cut a strip, the short way approximately 2-3 inches wide, but your choice, it'll work no matter the size. Cut through the entire stack, it'll be easier.
 Next, take a teaspoon of the artichoke filling and place at the end of the strip.
 Lifting up 2-3 thin sheets, start to fold up like you'd fold a flag. Take 1 corner up and make a triangle, push down a little to flatten the filling.
 Continue to fold up, making a triangle each time as you go.
 Almost there, don't worry if you have a square left over that isn't a triangle, simply fold it into place, the butter on top will do the rest.
 Folded up and ready for the baking sheet.
 Baste with the melted butter. For an added touch, try adding sesame seeds shown here, or poppy seeds, makes them very pretty.
 Sesame Seeds
 Bake at 400 degrees F for 15 minutes, and yummy. Shown at the left are the poppy seed ones.
 Sesame Seed ones.

______________________________________________________________________________
Bacon and Deviled Eggs

 Place 6 eggs in cold water and bring to a boil.
 Once Boiling, boil for 8minutes. Immediately put under cold water and peel the eggs.
 Mix up 1/4 cup of mayonnaise, 2 tbsp sour cream, sprinkle of pepper, and 1/4 tsp or rosemary.
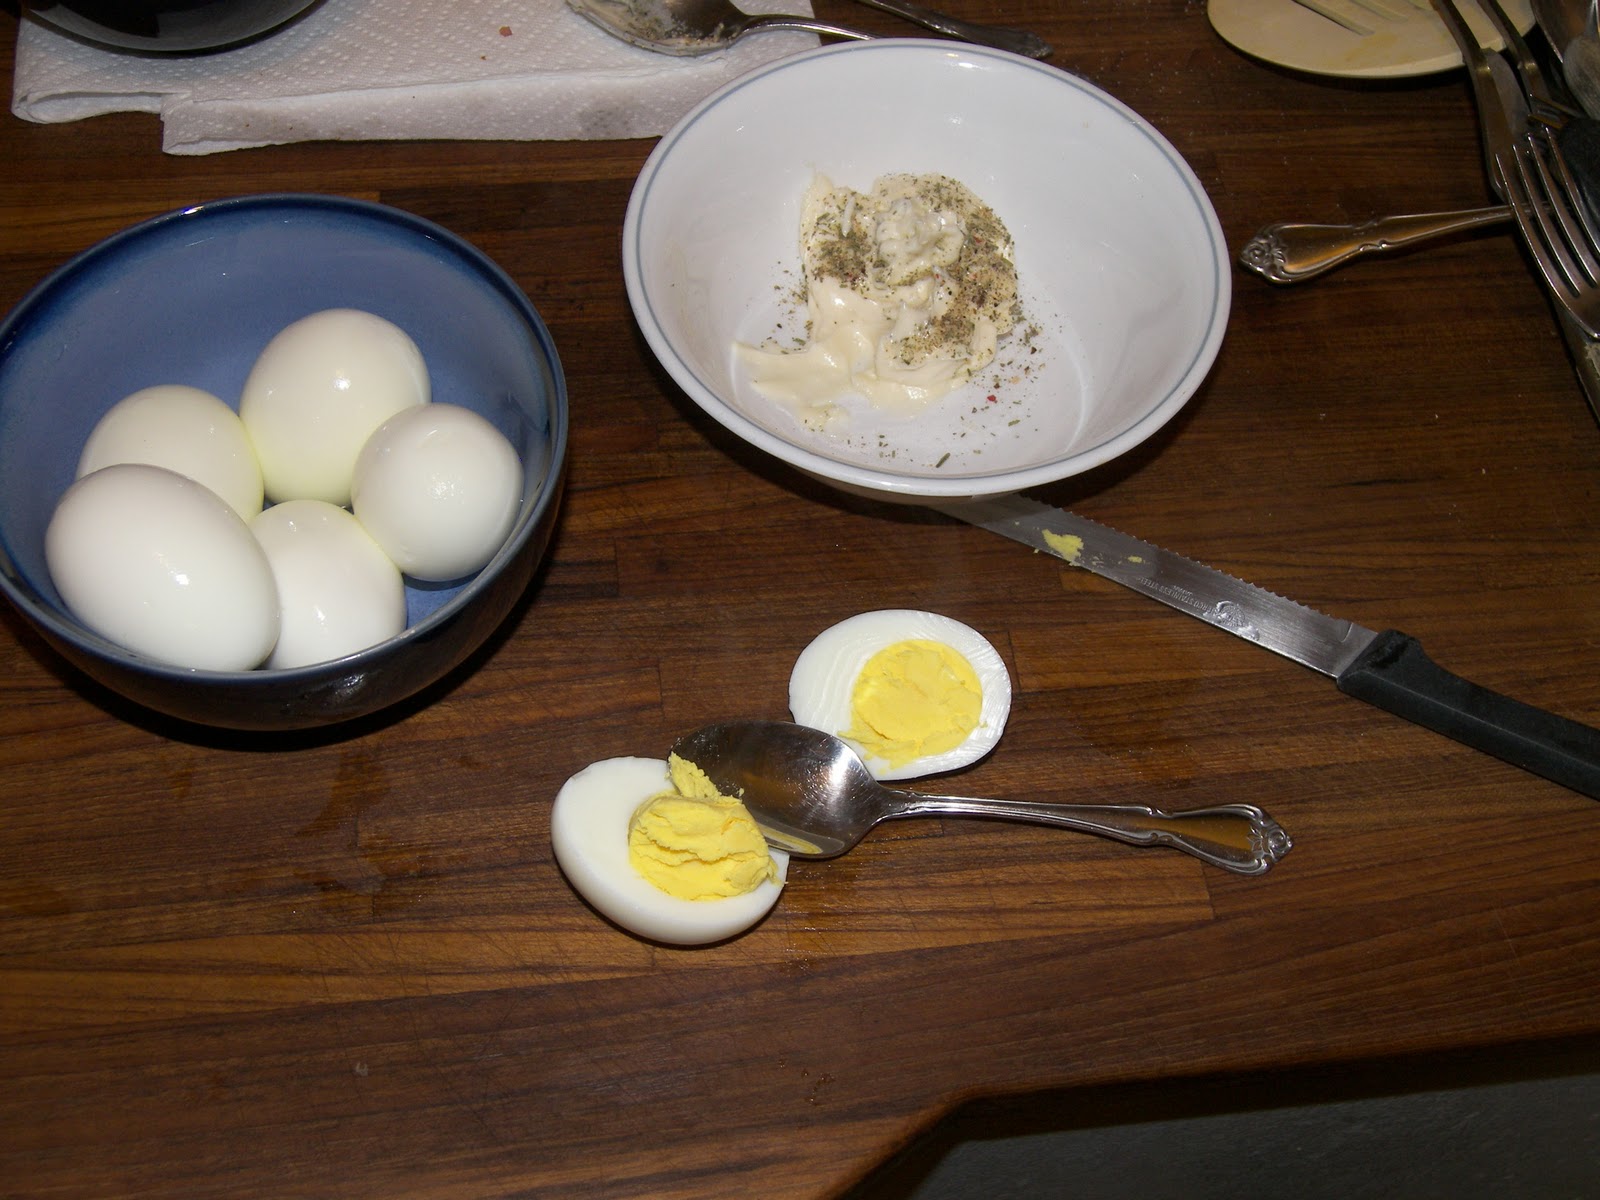
Next, cut open each egg the long way, and use a teaspoon to scoop our the yolk. Add yolk to the mayonnaise and sour cream mixture. With a fork, smooth it out. Fill the eggs with the mixture.
 Fry up 3 pieces of bacon. You won't need salt in this recipe, since the bacon already adds enough salt.
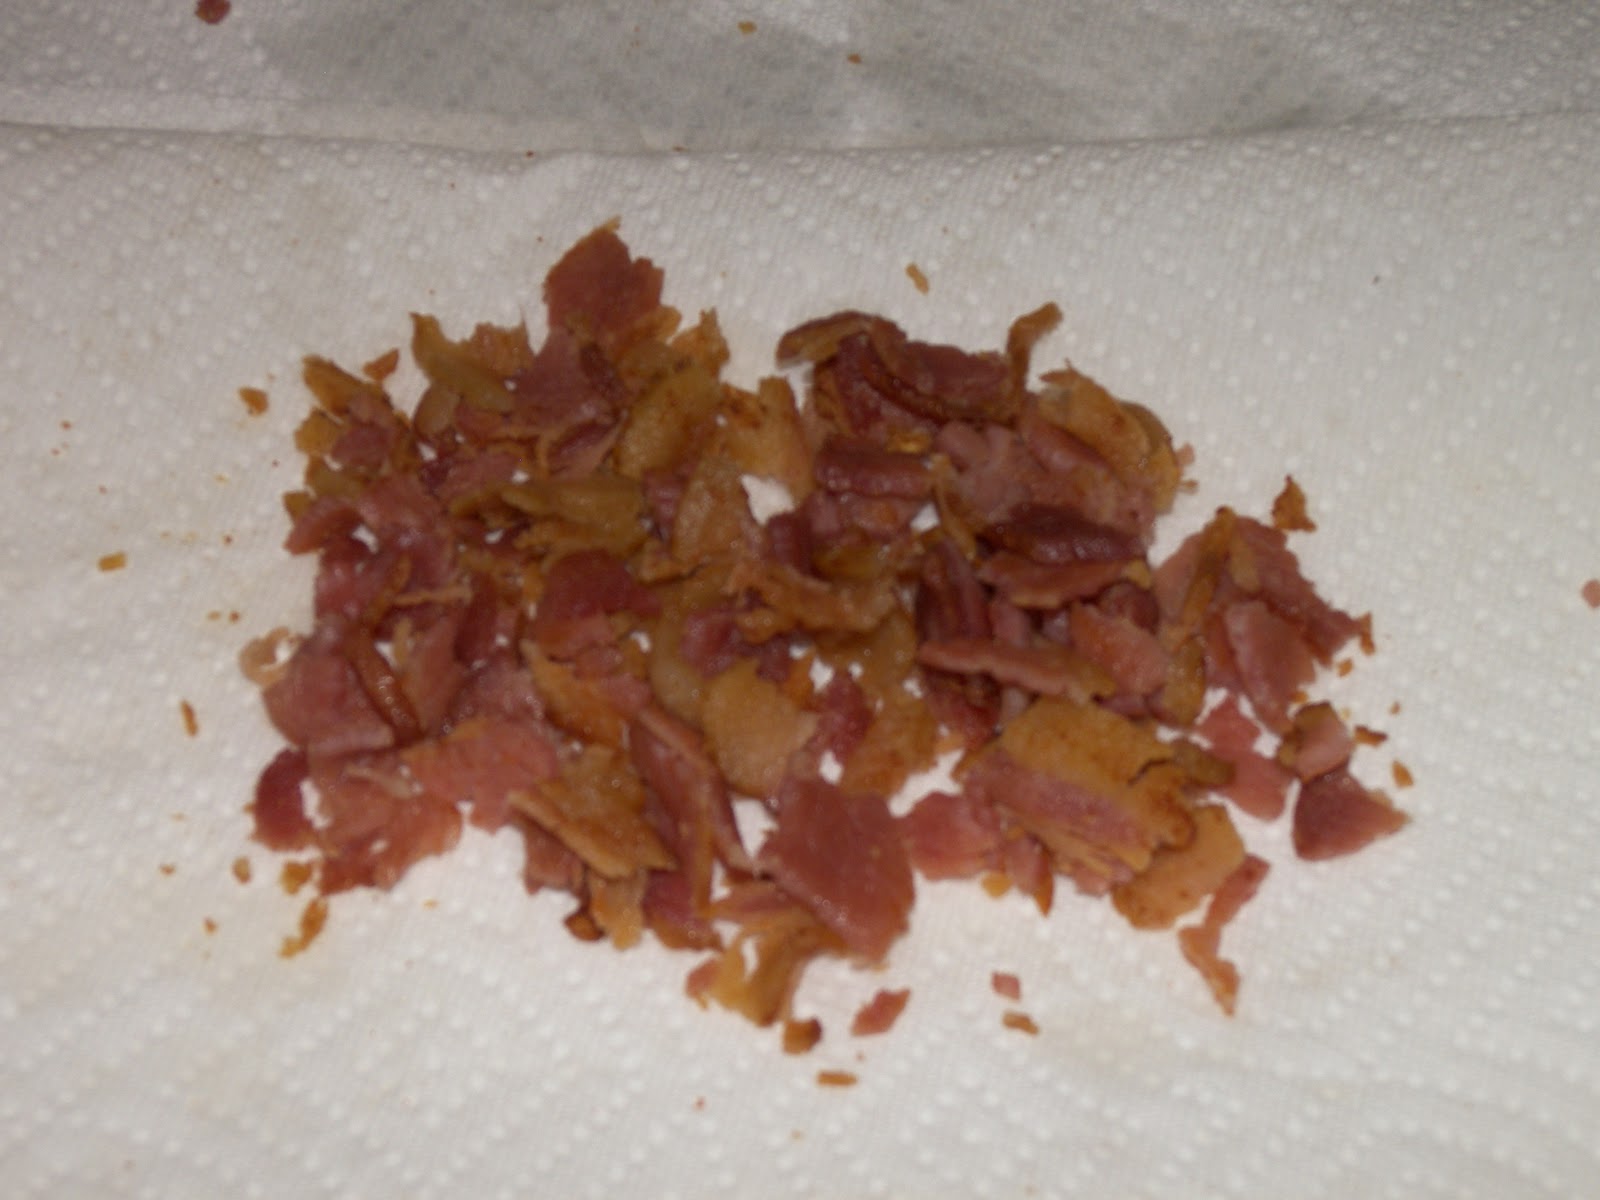 Crumble up the bacon by hand and sprinkle onto the top of the eggs.Bacon and Deviled egg appetizers.
________________________________________________________________________
Brie in Puff Pastry &
Mango, Brie & Port in Puff Pastry

You can do these in any size you like. Add additional ingredients to your liking.
This one is totally simple.
Take puff pastry (available in grocery store freezer section-defrost and use), and using a knife or pizza cutter, make a strip of dough. Put in the brie, no white rind into the center, and fold over. Cook for 20-25 minutes at 400 degrees F. until golden brown. The cheese will be melty and the crust crispy.
Mango, Port, and Brie in Puff Pastry
I tried this with some re-hydrated mango (set dehydrated mango pieces in water for 20 minutes), Brie cheese, and a port wine reduction, was so yummy. I used a nice older thickish port wine. You put on the stove top over medium heat, until it reduces by 1/2-it will be thicker and make an amazing addition, either in it or on plate with it.
__________________________________________________________________________


 You can do these either as circles or squares, your choice depending on your equipment, and wants. These are ring molds, use as cookie cutters for the bottom on your h'orderve pastries. Place the circles into greased ring molds at the bottom.
 Cut 1 1/2 inch strips to line the side, pressing down onto the circle placed in the bottom already. Prick the bottom with a fork a few times.
 Bake 20-25 minutes until golden brown. During the cooking process, these circle ones may need reshaping as they puff up. Simply use a spoon to press against the sides again a couple of times.
 Cool on a wire rack.
 Making the Square ones are simpler. Make the same as above but use a pizza wheel or ravioli cutter or a knife as shown above.
  Cut out small squares and then using the same cutter make strips, and then cut them the other way to make small square sides. Brush with egg to seal next layer, and put on the sides.
 Brush egg wash between each layer, and stack up 2 layers of additional sides on each side of the square.
 Bake 350 degrees F 20-25 minutes until golden brown, then cool on a rack.


 _________________________________________________________________________
Cheese Puffs-Parmesan Cheese Puffs
No, not your out of a bag cheese puff, yummy light creations, like cream puffs. These are Parmesan puffs.


 Using a whisk, mix in the flour, don't worry if it looks like it wont' mix, it will.
 Mix until it starts to form a ball. Next you will add in the eggs all at once. I have done this with a whisk in the same pan, but have found a mixer will save you worry and trouble.
 Place pan ingredients into the mixer, adding the eggs all at once. Mix a few minutes until smooth as shown below.

 You can use a pastry bag to get these perfect, but I really enjoy the rustic difference once they're cooked. I flatten slightly with a spatula, but not necessary. Bake at 400 degrees F for 25 minutes until golden brown. Cool on a rack for 10-15 minutes.


 Using a bread knife or serrated knife, cut in half.

 How they look inside.
 Add a pinch of the additional Parmesan you put aside.
 Put tops back on trying to match them up from how they were baked.
Super light and decadent at the same time.
 They are at the top of the dim sum plate.
____________________________________________________________________________

 You will need Phyllo sheets, 1 cup of Parmesan grated, 1 ear of corn, 1/2 cup of mayonnaise, dill, and 2-4 tablespoons of melted butter.
 Cut corn off the cob by standing it on end and cutting off with a sharp knife.
 Ready to go, corn is off the cob, and Parmesan is grated.
 Prepare a baking sheet with either a silpat (silicone baking sheet), my favorite, or spray with a cooking spray.
 Next you will need a basting brush, 2-4 tbsp of butter or margarine and a package of Phyllo dough from your grocery freezer section. These are thin crispy pastry sheets.
 This is the pyllo dough. Keep the portion of the phyllo that you aren't using at this moment rolled up, or covered with a clean damp towel. I like to use a pizza cutter to cut my strips, it works best, but a knife is fine too.
 Cut a strip, the short way approximately 2-3 inches wide, but your choice, it'll work no matter the size. Cut through the entire stack, it'll be easier.
 Mix the ingredients and place in a bowl.
 Next, take a teaspoon of the filling and place at the end of the strip. Lifting up 2-3 thin sheets, start to fold up like you'd fold a flag. Take 1 corner up and make a triangle, push down a little to flatten the filling.


 Ready for the baking sheet and melted butter
 These I used Dill on top, a nice addition to the corn.
 Now basted in butter
 Now sprinkled with dill
 Bake at 400 degrees for 15 minutes until golden brown.
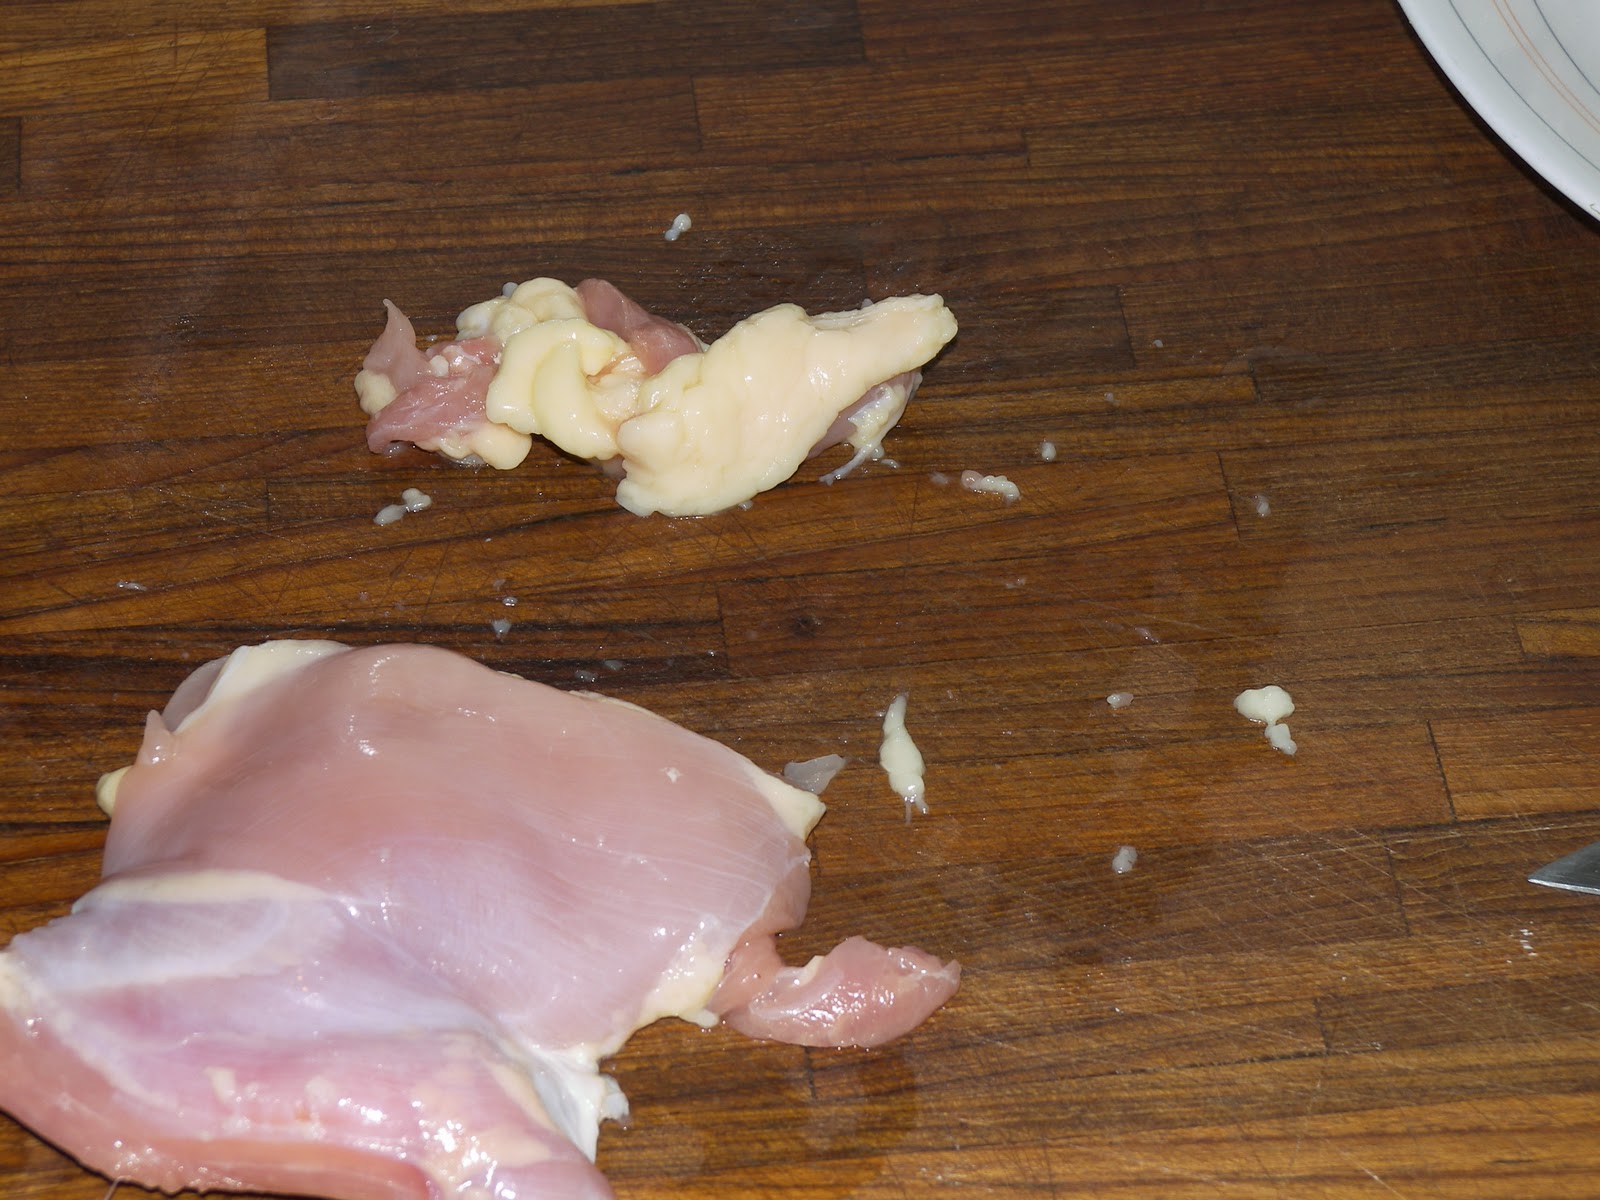
Chicken Nuggets, with panko and oven baked

 Cut off the fat from chicken thighs, and cut them into 6-8 pieces


 Mix the panko and all the herbs together. Spray a baking sheet with oil, or use a silpat (silicone baking sheet). Simply place the nuggets into the breadcrumb mixture and put on the baking sheet. Bake at 350 degrees F for 25 minutes. They'll be crispy and Not fried.
They are at the top of the dim sum plate. I like to serve chicken nuggets with a honey mustard. Super simple, it's 1 part honey to 2 parts Gulden's brown mustard.
____________________________________________________________________
Brie in Puff Pastry &
Mango, Brie & Port in Puff Pastry
You can do these in any size you like. Add additional ingredients to your liking.
This one is totally simple.
Take puff pastry (available in grocery store freezer section-defrost and use), and using a knife or pizza cutter, make a strip of dough. Put in the brie, no white rind into the center, and fold over. Cook for 20-25 minutes at 400 degrees F. until golden brown. The cheese will be melty and the crust crispy.
Mango, Port, and Brie in Puff Pastry
I tried this with some re-hydrated mango (set dehydrated mango pieces in water for 20 minutes), Brie cheese, and a port wine reduction, was so yummy. I used a nice older thickish port wine. You put on the stove top over medium heat, until it reduces by 1/2-it will be thicker and make an amazing addition, either in it or on plate with it.
__________________________________________________________________________
Butternut squash in puff pastry


Mis en plas (your ingredients before you start)
Ingredients:
l can of vegetable stock (14.5 oz)
l box of puff pastry from your freezer section in your supermarket-2 sheets
1 1/2 cups Butternut squash, (boiled in veg stock for 4 minutes, then drained and mashed)
oil spray
Salt
Pepper
1/2 tsp Nutmeg
1 egg to seal the edges
 You can do these either as circles or squares, your choice depending on your equipment, and wants. These are ring molds, use as cookie cutters for the bottom on your h'orderve pastries. Place the circles into greased ring molds at the bottom.
 Cut 1 1/2 inch strips to line the side, pressing down onto the circle placed in the bottom already. Prick the bottom with a fork a few times.
 Bake 20-25 minutes until golden brown. During the cooking process, these circle ones may need reshaping as they puff up. Simply use a spoon to press against the sides again a couple of times.
 Cool on a wire rack.
 Making the Square ones are simpler. Make the same as above but use a pizza wheel or ravioli cutter or a knife as shown above.
  Cut out small squares and then using the same cutter make strips, and then cut them the other way to make small square sides. Brush with egg to seal next layer, and put on the sides.
 Brush egg wash between each layer, and stack up 2 layers of additional sides on each side of the square.
 Bake 350 degrees F 20-25 minutes until golden brown, then cool on a rack.
Making the Filling:
Peel and cube 1/2 of a small butternut squash.  Boil in 1 can of vegetable stock (fat free and salt free) for 4-5 minutes until soft enough to mash. Remove the cooked pieces with a slotted spoon. I prefer to use a Cuisinart to blend up, but you can mash by hand if you prefer, just get it smooth, and no lumps if by hand.
 Boil in 1 can of vegetable stock (fat free and salt free) for 4-5 minutes until soft enough to mash. Remove the cooked pieces with a slotted spoon. I prefer to use a Cuisinart to blend up, but you can mash by hand if you prefer, just get it smooth, and no lumps if by hand.
 Add spices and fill into cooked shells.

Then just before service, at 350 degrees F, reheat for 10-15 minutes. yummy.

Cheese Puffs-Parmesan Cheese Puffs
No, not your out of a bag cheese puff, yummy light creations, like cream puffs. These are Parmesan puffs.


Ingredients:
1 cup water
4 eggs
1 cup of flour
1/2 cup butter or margarine (butter makes them better)
1/2 cup of Parmesan
1 extra cup of Parmesan to fill them with after first baking


Melt the butter in the water over medium heat, and bring to a boil.

 Using a whisk, mix in the flour, don't worry if it looks like it wont' mix, it will.
 Mix until it starts to form a ball. Next you will add in the eggs all at once. I have done this with a whisk in the same pan, but have found a mixer will save you worry and trouble.
 Place pan ingredients into the mixer, adding the eggs all at once. Mix a few minutes until smooth as shown below.
 You can use a pastry bag to get these perfect, but I really enjoy the rustic difference once they're cooked. I flatten slightly with a spatula, but not necessary.

 Using a bread knife or serrated knife, cut in half.
 How they look inside.
 Add a pinch of the additional Parmesan you put aside.
 Put tops back on trying to match them up from how they were baked.
At this point you can put in the refrigerator until ready to eat them.
when you are ready for them, heat oven to 350 degrees F, and reheat for 8 minutes.
Super light and decadent at the same time._____________________________________________________________________________
Chicken Nuggets-Breaded in Panko and oven baked They are at the top of the dim sum plate.
____________________________________________________________________________
Corn Off the Cob, Parmesan in Phyllo pastry

 You will need Phyllo sheets, 1 cup of Parmesan grated, 1 ear of corn, 1/2 cup of mayonnaise, dill, and 2-4 tablespoons of melted butter.
 Cut corn off the cob by standing it on end and cutting off with a sharp knife.
 Ready to go, corn is off the cob, and Parmesan is grated.Prepare a baking sheet with either a silpat (silicone baking sheet), my favorite, or spray with a cooking spray.Next you will need a basting brush, 2-4 tbsp of butter or margarine and a package of Phyllo dough from your grocery freezer section. These are thin crispy pastry sheets.This is the pyllo dough. Keep the portion of the phyllo that you aren't using at this moment rolled up, or covered with a clean damp towel. I like to use a pizza cutter to cut my strips, it works best, but a knife is fine too. Cut a strip, the short way approximately 2-3 inches wide, but your choice, it'll work no matter the size. Cut through the entire stack, it'll be easier.
 Mix the ingredients and place in a bowl.
 Next, take a teaspoon of the filling and place at the end of the strip. Lifting up 2-3 thin sheets, start to fold up like you'd fold a flag. Take 1 corner up and make a triangle, push down a little to flatten the filling.
Continue to fold up, making a triangle each time as you go.

Almost there, don't worry if you have a square left over that isn't a triangle, simply fold it into place, the butter on top will do the rest.


 Ready for the baking sheet and melted butter
 These I used Dill on top, a nice addition to the corn.
 Now basted in butter
 Now sprinkled with dill
 Bake at 400 degrees for 15 minutes until golden brown.
__________________________________________________________________

Ingredients:
2 cups Panko breadcrumbs
1 tbsp rosemary
1 tsp garlic powder
1 tsp onion flake
1/2 tsp salt
1/4 tsp pepper
5-6 boneless chicken thighs
 Cut off the fat from chicken thighs, and cut them into 6-8 pieces

 Mix the panko and all the herbs together. Spray a baking sheet with oil, or use a silpat (silicone baking sheet). Simply place the nuggets into the breadcrumb mixture and put on the baking sheet. Bake at 350 degrees F for 25 minutes. They'll be crispy and Not fried.
 They are at the top of the dim sum plate.
 I like to serve chicken nuggets with a honey mustard. Super simple, it's 1 part honey to 2 parts Gulden's brown mustard.
____________________________________________________________________

Crab Cakes with Dill Relish and Lime
Step by Step Instructions
Mis en plas ( a French term meaning everything in place. I always try and have all my ingredients together before cooking.)

Ingredients:
2 Large Cooked Crab Legs-taken out of the shell-*see below for instruction
leaving you with 1 cup of crab meat
1/8 cup of mayonnaise
1/4 cup sweet onion or scallions
1 egg
3/8 cup flour
1/2 tsp salt
pepper-3 turns from grinder
1/2 tsp garlic powder
1/2 tsp dried flaked onion
Canola or Peanut oil for frying.
1 1/2 cups Panko breadcrumbs (you can use progresso breadcrumbs too, or homemade) Kikoman Panko are my favorite for this recipe, and it can be noted, they're vegan for other recipes
Lime Garnish
Dill Relish- mix up, into a serving bowl, done
1/2 cup mayonnaise
1/4 pickle relish, either sweet or dill, you decide. ( I used sweet)
1 tsp dill herb
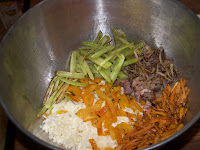
Ok, Now how to make them:
 Mix together all the ingredients except the panko. It may not look appealing at this point, but they are wonderful. I would normally have put in scallions, the green bits add a lot of color, but I often come up with new recipes, based on what is in the refrigerator, the garden, and pantry today. I feel we all do this, use what we have.
 Take a small amount of the mixture and make a patty in your hand. Place into the breadcrumbs and coat each side. Press them a little to your desired thickness. I like them thin and crispy, but if you like them thicker, feel free, and extend the cooking time below by a minute or 2. If not the shape you like, simply move them around until you're happy with them. Place on wax paper, or a silpat (silicone baking sheet that reduces sticking). Then you're onto frying or placing in the refrigerator.
Do ahead tip: At this stage, they can be put into the refrigerator for hours until you're ready to fry them up. Meanwhile prepare your sauce and lime garnish
This is a very simple, lime garnish that really adds to the flavor when squeezed onto your done crab cakes.
This is done using a small knife. Cut into the center of the lime, and continue around the entire lime cutting a zig zag line, then separate the lime, and you have 2 pretty garnishes.
Dill Relish- mix up, into a serving bowl, done
1/2 cup mayonnaise
1/4 pickle relish, either sweet or dill, you decide. ( I used sweet)
1 tsp dill herb
 Heat up Canola (Peanut oil is also good for frying but I prefer Canola here, it's a less strong flavor and lets the crab flavor come out more.) over medium heat. You are not deep frying, so just coat the bottom of your fry pan about 1/8-1/4" in oil. A trick I use to find out if my oil is hot enough, is to put a wooden chop stick into it. If it bubbles, then your oil is hot enough to fry. When it's hot, cook about 2 1/2-3 1/2 minutes, turning over once in the cooking process.
Spatzle-a dumpling, a Hungarian treat

Ingredients:
2 eggs slightly stirred
1/4 cup milk
1 cup flour (to be authentic, use cream of wheat)
dash of pepper
1/2 tsp salt
2 tsp of rosemary
1 whole head of roasted garlic (see chicken pot pie recipe for how to roast garlic)
First roast the garlic as described on the chicken pot pie recipe, then mix all ingredients together to make your spatzle dough. This can be used atop chicken stews, but I like it best with melted butter and salt as a side dish to a nice meat dish.


 Although I love having the spatzle maker, I prefer how my mom taught me, which was to put the dough on the board and push off with a butter knife into the salted water. I can then control their size, which I prefer 3 inches long and about 1/2 an inch wide. Boil in salted water for about 5 minutes and then drain, put back in the pan with a few tablespoons of butter. These are the ones created with the spatzle maker. I will later put up the larger ones which I prefer. Still Delicious, I just like a little more dumpling in each bite.
________________________________________________________________________
Super Easy Olive Dip
Take 1/2 cup mayonnaise
1/2 cup sour cream
1 small can of chopped black olives
3 kalamata olives-chopped (or your favorite fancy olive-there for intensity of flavor)
a sprinkle of salt and pepper, and 1/4 tsp dill
mix up and put on your favorite crackers-I like Ritz crackers for this dip. Also good with the Parmesan crackers recipe on this site.
___________________________________________________________________

Vegetable Tower
Ingredients:
1 broccoli stem, peeled, chopped, boiled until done, then blanched in a cold water bath
1/2 tomato, Roma copped fine
yellow squash chopped fine
1/8-1/4 cup Parmesan
salt and pepper,
garlic powder
dill
place in a square mold, a ring mold one layer at a time, with Parmesan in between the layers. Press down a little and then remove mold.
___________________________________________________
Amuse Bouche-tiny 1 bite appetizers
 I like to serve this in Saki cups like these. A great amus bouche (and vegan too)
  Peel and cube 1/2 of a small butternut squash. Boil in 1 can of vegetable stock (fat free and salt free) for 4-5 minutes until soft enough to mash. Remove the cooked pieces with a slotted spoon and save for use in other recipes, and use the liquid for consomme (*just strain with a fine mesh strainer {picture below}, and serve warm-so so good-a vegan treat too) I prefer to use a Cuisinart to blend up, but you can mash by hand if you prefer, just get it smooth, and no lumps if by hand.
 Pour through a Fine Mesh strainer for remaining liquid
* Butternut squash Consomme-great stuff, and great vegan treat too. See above recipe for how this is made.

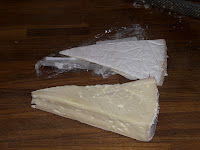 Remove the white rind. Don't throw it away, but the cheese without it is better for this purpose.
 Brie and Prosciutto sliced ultra thin.
 Orange Supremes-instructions below
 spread out 1 piece of proscuitto and place 1 orange supreme and a rectangle of brie cheese on the short end.
 Roll up, done.
 Make the rest of them for your platter.
Serve with a few extra supremes for garnish.

How to make Orange Supremes

These are beautiful slices of oranges that have no rind or membrane remaining.
They are wonderful atop curry dishes, orange sauces, or served alone.

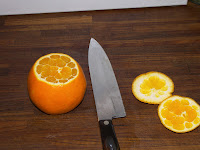
This is accomplished by cutting off the top and bottom of the orange just past the peel.
Set it on one of the flat sides on your cutting surface.
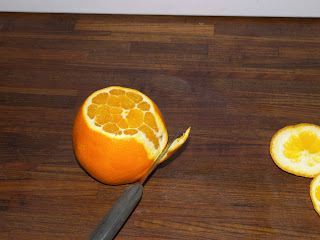

Then,using your paring knife, you cut away the remaining peel in strips from top to bottom until all the peel is removed.
Don't worry if you see additional white membrane or peel, simply cut it away before the next step.

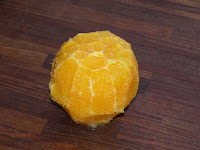
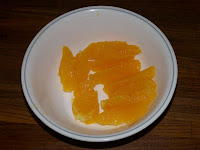
Look at the sections
in the orange, holding the orange, cut down the edge of the interior membrane and when you reach the bottom of the section, angle the knife to the right and slice out the supreme into a bowl.

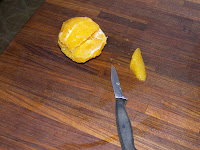
Continue until the entire orange is done. Remember you can use the rest of the orange too, give it a quick squeeze and use the juices in your recipe.


Ingredients:
1 boneless chicken thigh, remove fat, and cut into 6-8 pieces
1 Bratwurst (I prefer the Johnsonville bratwurst, they taste the best to me)
1 1/2 tbsp soy sauce
1/2 tbsp sherry
1/2 tbsp sesame oil
1/2 tbsp brown sugar
dash of pepper
1 1/2 tbsp cornstarch
10-15 won ton wrappers
Filling directions:
Note, you can fill these with anything you like, I like this recipe best.

 Cut off the fat from the chicken thigh, and cut it into 6-8 pieces and place into a Cuisinart or chopper.

Slit the bratwurst casing with a knife and remove inner meat, throw away the casing. Chop up the chicken and the bratwurst in the Cuisinart.


Remove into a bowl. Add all the other ingredients including the cornstarch.

Place about 1/2-1 tsp of filling onto a wrapper. Pinch edges together on both sides, and then sort of form a bag shape with it, squeezing a little at the top.

 Place into a steamer or shown here is a bamboo steamer. With these I like to use a damp clean cloth in the bottom. The steam gets through, and the dim sum are easy to remove.
 Continue making them and putting them in the steamer, trying to not have them touching one another. Steam in a wok or steaming pan for 5-8 minutes.
Serve with dipping sauce of your liking.
Many people serve this with just soy sauce.
I usually mix up some soy, sesame oil, sherry, balsamic vinegar, and ginger (often I use powder, but fresh slivers in this dip is wonderful.
I'm still working on making them prettier, but they taste wonderful, try them yourself, and let me know how you like them.
Super Easy Olive Dip
Take 1/2 cup mayonnaise
1/2 cup sour cream
1 small can of chopped black olives
3 kalamata olives-chopped (or your favorite fancy olive-there for intensity of flavor)
a sprinkle of salt and pepper, and 1/4 tsp dill
mix up and put on your favorite crackers-I like Ritz crackers for this dip. Also good with the Parmesan crackers recipe on this site.
_______________________________________________________________________________
2 Large Cooked Crab Legs-taken out of the shell-*see below for instruction
leaving you with 1 cup of crab meat
1/8 cup of mayonnaise
1/4 cup sweet onion or scallions
1 egg
3/8 cup flour
1/2 tsp salt
pepper-3 turns from grinder
1/2 tsp garlic powder
1/2 tsp dried flaked onion
Canola or Peanut oil for frying.
1 1/2 cups Panko breadcrumbs (you can use progresso breadcrumbs too, or homemade) Kikoman Panko are my favorite for this recipe, and it can be noted, they're vegan for other recipes
Lime Garnish
Dill Relish- mix up, into a serving bowl, done
1/2 cup mayonnaise
1/4 pickle relish, either sweet or dill, you decide. ( I used sweet)
1 tsp dill herb
Ok, Now how to make them:
Mix together all the ingredients except the panko. It may not look appealing at this point, but they are wonderful. I would normally have put in scallions, the green bits add a lot of color, but I often come up with new recipes, based on what is in the refrigerator, the garden, and pantry today. I feel we all do this, use what we have. Take a small amount of the mixture and make a patty in your hand. Place into the breadcrumbs and coat each side. Press them a little to your desired thickness. I like them thin and crispy, but if you like them thicker, feel free, and extend the cooking time below by a minute or 2. If not the shape you like, simply move them around until you're happy with them. Place on wax paper, or a silpat (silicone baking sheet that reduces sticking). Then you're onto frying or placing in the refrigerator.
Do ahead tip: At this stage, they can be put into the refrigerator for hours until you're ready to fry them up.
 Meanwhile prepare your sauce and lime garnish
This is a very simple, lime garnish that really adds to the flavor when squeezed onto your done crab cakes.
This is done using a small knife. Cut into the center of the lime, and continue around the entire lime cutting a zig zag line, then separate the lime, and you have 2 pretty garnishes.

Dill Relish- mix up, into a serving bowl, done
1/2 cup mayonnaise
1/4 pickle relish, either sweet or dill, you decide. ( I used sweet)
1 tsp dill herb
 Heat up Canola (Peanut oil is also good for frying but I prefer Canola here, it's a less strong flavor and lets the crab flavor come out more.) over medium heat. You are not deep frying, so just coat the bottom of your fry pan about 1/8-1/4" in oil. A trick I use to find out if my oil is hot enough, is to put a wooden chop stick into it. If it bubbles, then your oil is hot enough to fry. When it's hot, cook about 2 1/2-3 1/2 minutes, turning over once in the cooking process.
Drain on a paper towel, and enjoy with lime and dill relish.
__________________________________________________________
Crab-Breaking Down King Crab Legs


 Some parts may come out crumbly, but no worries, it'll taste fine. I usually use them in crab cakes or h'orderves anyway. If making a crab cocktail (like a shrimp cocktail) you'll probably want to use the largest whole pieces that are created on top.


Work through all the pieces the same way and your ready for any crab dish.
______________________________________________________________________________

This filling makes an amazing cold cracker topper as a great amus bouche too._____________________________________________________________
Dumplings-Steamed Dumplings (Dim Sum)
Ingredients:
1 boneless chicken thigh, remove fat, and cut into 6-8 pieces
1 Bratwurst (I prefer the Johnsonville bratwurst, they taste the best to me)
1 1/2 tbsp soy sauce
1/2 tbsp sherry
1/2 tbsp sesame oil
1/2 tbsp brown sugar
dash of pepper
1 1/2 tbsp cornstarch
10-15 won ton wrappers
Filling directions:
Note, you can fill these with anything you like, I like this recipe best.
Cut off the fat from the chicken thigh, and cut it into 6-8 pieces and place into a Cuisinart or chopper.
Slit the bratwurst casing with a knife and remove inner meat, throw away the casing. Chop up the chicken and the bratwurst in the Cuisinart.
Remove into a bowl. Add all the other ingredients including the cornstarch.
Place about 1/2-1 tsp of filling onto a wrapper. Pinch edges together on both sides, and then sort of form a bag shape with it, squeezing a little at the top.
Place into a steamer or shown here is a bamboo steamer. With these I like to use a damp clean cloth in the bottom. The steam gets through, and the dim sum are easy to remove.Continue making them and putting them in the steamer, trying to not have them touching one another. Steam in a wok or steaming pan for 5-8 minutes.
Serve with dipping sauce of your liking.
Many people serve this with just soy sauce.
I usually mix up some soy, sesame oil, sherry, balsamic vinegar, and ginger (often I use powder, but fresh slivers in this dip is wonderful.
I'm still working on making them prettier, but they taste wonderful, try them yourself, and let me know how you like them.
_____________________________________________________________________
Egg Rolls


Ingredients:
1 cup of cheese (I used a mixture of Romano, Parmesan, Fontina, and Mozzarella)
1 cup of carrots, julienned
2 celery stalks, julienned
2 broccoli stems, peeled, and julienned
1/2 of an orange bell pepper-roasted
1/4 cup left over meat (I used left over steak) can be omitted, up to you.
Egg roll wrappers
First you prepare all of your ingredients. Julienne the vegetables as shown below.
How to Julienne a carrot

 Roll carrot over onto the flat edge.

 Slice into thin strips.
 Continue with the rest of the carrots. Done
 Take your shallot, and cut off the top and the bottom as shown. Make a small slit in the skin to make it easy to peel off.


 Slice into even strips.
 Then, cut those strips into 1/2 or 1/3 the long way to get long thin strips.
---------------------------
How to Peel and Julienne a Broccoli Stem
 First, use a paring knife to cut the larger rough stem that will clog your potato peeler.

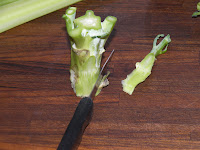 Continue all around it, cutting off the nubs.
 When done, it should look approximately like this.
 Next peel them with a potato peeler. The one on the left has been peeled and the one on the right still needs peeling.
 2 Done sections, ready to cut. You can use these so many ways.
 Slice into long wide strips, then slice those strips into 1/2 or 1/3 the long way to form long thin strips.

 Roast the bell pepper right on the open flame of your stove. This way requires no oil, and gives it both a roasted flavor, but also removes the skin which can be tough sometimes.
 Blacken all of the outer skin. Place wrapped up tight in foil for 5 minutes. It steams in there and makes the skin easy to remove.


 Use a spoon to easily remove the skin. Don't worry if a little black remains, it doesn't taste bad at all.

 Slice into strips
 Now all your ingredients are ready.
 Salt and pepper each set of vegetables you stir fry in olive oil. Do the batches separately so that they are all done perfectly. When almost done, remove to a bowl you've set aside to mix all the egg roll ingredients.


 If leftover oil in the pan, use it to start your next batch.

 Add more olive oil as needed.
 Don't worry about browning onions, the carmelization is wonderful flavor.
 Note the browned bits on the bottom on the pan, these are amazingly flavorful. Use your spatula to get all of the up and onto the food.

 Stir fry the celery until almost done.

 Stir fry the carrots until almost done.
 All the ingredients in the bowl. No need to cook the leftover meat, it's already cooked, as is the bell pepper.
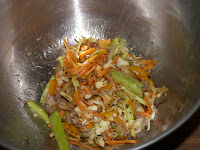 Mix it all together mixing well.

 Now you're ready to assemble. Place a silpat (silicone baking sheet) or a piece of wax paper down to place your uncooked egg rolls on while making the rest of them. You will need 1 egg slightly stirred to baste the edges, and the egg roll wrappers.
 Place a couple of tablespoons of your mixture into the center of the egg roll as shown.

 Fold up the bottom edge, and pull back with you fingers a little to make more snug and less air. Brush the remaining 2 long edges with egg. This will help it stick together and not open up in your hot oil.


Fold up the right side corner, pressing a little to seal it, and trying to make it tight. Then fold up the left corner the same way, kind of like an envelope.

 Fold up, rolling as tight as possible without tearing. Fold Again and it's ready.
If it tears, no worries, simply roll it again in another wrapper, even on top of the other wrapper will be fine.
 Fry Egg rolls over medium high heat-375-400 degrees F.
 Turn over during the cooking and continue cooking until golden brown, approximately 5 minutes per batch. Only do 4-5 at a time, (so that it doesn't cool down the oil too much and leave you with soggy egg rolls)
 Drain off excess oil on a paper towel. For a pretty presentation, try cutting them at an angle, and arrange on a platter.

______________________________________________________________________________


Fruit Appetizer, with fancy cheeses & sage honeycomb
This is so easy, use whatever items you like. I enjoy it spread out on a large plate, and making the cheeses in different
shapes. This appetizer has apple slices, raspberries, Ireland Dubliner cheese, Aged Cheddar cheese, Parmesan cheese triangles, and Sharp Cheddar, almonds and sage Honeycomb.
Sage Honeycomb-surprisingly good with fruit and cheeses. We went to a tasting menu at the Ritz Carlton one time, and they served their cheese course with honeycomb, so I tried it at home, and loved it.

stuffed with a chicken/bratwurst mixture
Ingredients for filling:
1 boneless chicken thigh, remove fat, and cut into 6-8 pieces
1 Bratwurst (I prefer the Johnsonville bratwurst, they taste the best to me)
1 1/2 tbsp soy sauce
1/2 tbsp sherry
1/2 tbsp sesame oil
1/2 tbsp brown sugar
dash of pepper
1 1/2 tbsp cornstarch
Filling directions:
Note, you can fill these with anything you like, I like this recipe best.
Cut off the fat from the chicken thigh, and cut it into 6-8 pieces and place into a Cuisinart or chopper.
Slit the bratwurst casing with a knife and remove inner meat, throw away the casing. Chop up the chicken and the bratwurst in the Cuisinart. Remove into a bowl. Add all the other ingredients including the cornstarch. Wrap the grape leaves as you would an egg roll or or stuffed cabbage. Start by spreading out the leaf, and at the larger end of the leaf, place a small amount of the filling, approximately 2-3- tbsp.
Roll away from you one turn, and fold in the sides. Then continue rolling up until at the end. Place a cloth that has been rinsed under water and then wrung out a little onto the bamboo or steaming area. This will keep them from sticking when done. Then place the finished grape leaves into the steamer, seam sides down. Steam for approximately 5-6 minutes until firm. Enjoy with a dipping sauce. I find a heated apricot preserve very nice.
_______________________________________________________________
Cut the avocados lengthwise all around using the pit as a guide. Twist the avocado a little and separate as shown._______________________________________________________________________________

Pizza, Gluten Free Pepperoni Pizza


 Cover with a cling wrap and a clean towel, and place in a warm part of your kitchen. Let rest for 1 hour. To be honest, I'm not sure this step makes a difference, as gluten free dough doesn't rise the same as regular dough.
 Cover your board in flour and begin to roll out into a rectangle or circle. All you're really trying to do is get the dough to be even across it and the thickness you desire. In this case, I was making mini pizzas so I made them a little thinner.

 I used a biscuit cutter and then a smaller one to make the mini pizza look like it had a crust like a larger one.
Next Make the pizza sauce:


 Fontina Cheese grated


 I thought they were prettier before they were cooked, but tasty so I'm happy. This is my first gluten free cooking.


Cover with a cling wrap and a clean towel, and place in a warm part of your kitchen. Let rest for 1 hour. To be honest, I'm not sure this step makes a difference, as gluten free dough doesn't rise the same as regular dough.
Cover your board in flour and begin to roll out into a rectangle or circle. All you're really trying to do is get the dough to be even across it and the thickness you desire. In this case, I was making mini pizzas so I made them a little thinner.
I used a biscuit cutter and then a smaller one to make the mini pizza look like it had a crust like a larger one.
Next Make the pizza sauce:
Fontina Cheese grated
 I thought they were prettier before they were cooked, but tasty so I'm happy. This is my first gluten free cooking.
1 beet, peeled and diced
1 baby bok choy
1/4 of large sweet onion, diced
l ear of corn
l small portabello mushroom
salt and pepper
 Firstly, if you don't want red hands, I suggest either gloves or paper towels between you and the beet, and I cut it on a separate board so it doesn't stain my butcher block.
 Place 1 can of vegetable broth in a sauce pan over medium heat.
  Add the diced beets to the broth and cook until they are soft and to your liking.
  Next, dice up the bok choy. Here I tend to separate the greens from the whitish stem as they cook in a different amount of time. Heat up a fry pan over medium heat, add olive oil to the hot pan. Stir fry the vegetables separately for best results adding salt and pepper to each batch. You can tell when each is perfectly done this way.
 Sauteing the onions. When soft and caramelizing, remove to the medium size bowl with the beets. By the way, I learned the other day, that when you want to caramelize and get all those nice browned bits off the bottom of the pan, you should not use not-stick pans as they "don't stick", shown my old way here.
 Cut corn off the cob by standing it on end and cutting off with a sharp knife.
 Saute the corn kernels.
 Saute the mushrooms.
 Mix the vegetables together. Not only is it a pretty mix, but the more colorful the vegetables, the better for you it is.
Mixed up and ready to top your pizzas.
Remove the white rind. Don't throw it away, but the cheese without it is better for this purpose.
Brie and Prosciutto sliced ultra thin.
Orange Supremes-instructions below
spread out 1 piece of proscuitto and place 1 orange supreme and a rectangle of brie cheese on the short end.
Roll up, done.
Make the rest of them for your platter.
Serve with a few extra supremes for garnish.
How to make Orange Supremes
These are beautiful slices of oranges that have no rind or membrane remaining.
They are wonderful atop curry dishes, orange sauces, or served alone.
This is accomplished by cutting off the top and bottom of the orange just past the peel.
Set it on one of the flat sides on your cutting surface.
Then,using your paring knife, you cut away the remaining peel in strips from top to bottom until all the peel is removed.
Don't worry if you see additional white membrane or peel, simply cut it away before the next step.
Look at the sections
in the orange, holding the orange, cut down the edge of the interior membrane and when you reach the bottom of the section, angle the knife to the right and slice out the supreme into a bowl.
Continue until the entire orange is done. Remember you can use the rest of the orange too, give it a quick squeeze and use the juices in your recipe.
 Shrimp cocktail
Ingredients:
1/2 pound of 16 count per pound shrimp
1 stalk of celery, peeled and chopped
2 Roma tomatoes, chopped
6-8 tbsp of your favorite cocktail sauce.
Mix up the sauce and tomatoes, place in a bowl and top with shrimp. Serve with lemon or lime.

______________________________________________________
Shrimp Cocktail in Phyllo


 Mix together all the ingredients except the melted butter and Phyllo.Prepare a baking sheet with either a silpat (silicone baking sheet), my favorite, or spray with a cooking spray.
Next you will need a basting brush, 2-4 tbsp of butter or margarine and a package of Phyllo dough from your grocery freezer section. These are thin crispy pastry sheets.
This is the pyllo dough. Keep the portion of the phyllo that you aren't using at this moment rolled up, or covered with a clean damp towel. I like to use a pizza cutter to cut my strips, it works best, but a knife is fine too.
Cut a strip, the short way approximately 2-3 inches wide, but your choice, it'll work no matter the size. Cut through the entire stack, it'll be easier.
 Lifting up 2-3 thin sheets, start to fold up like you'd fold a flag. Take 1 corner up and make a triangle, push down a little to flatten the filling.
 Continue to fold up, making a triangle each time as you go.
 Almost there, don't worry if you have a square left over that isn't a triangle, simply fold it into place, the butter on top will do the rest.
 Folded up and ready for the baking sheet.
 Baste with butter, and top with your favorite seasonings. I used sesame seeds and pepper on this one.
These are not the shrimp ones, but identical in appearance in every way but the herb on top. Oops, the family ate them before I could get a picture of them this time.______________________________________
__________________________________________________________
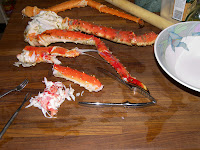
Crab-Breaking Down King Crab Legs


Shown is 1 1/2 pounds of cooked* king crab legs. I like to get the ones that have the large knuckles at the end as they produce more meat for your money. This 1 1/2 pounds purchased gave me 3 cups of crab meat.
If you have a shell cracker and pick, it will really help you. Also a small cocktail fork or spoon will help push out the crab meat. And, a rolling pin will help to remove the little bit at the end of the legs
*Note: Here in California, it is hard to come by fresh king crab. If you are one of the lucky ones who can find it fresh, simply steam it for 10-12 minutes. I like to put seasonings in the steaming water-caraway seeds are a super addition. I usually put salt, caraway seeds, dill, and garlic-(since it's in the steaming water, simply peel, smash the cloves, and just add) in the water. Serve with melted butter.


Break apart each leg into smaller pieces. This will make it easier to remove the meat.


Use the cracker or carefully hit with the side of your cleaver to crack the shell a little to help make it easier to get out the meat. I use the little fork or picker to push the meat to the largest end of the piece. I also use my fingers a lot to push the meat to the larger end, your hands are your best tool. Shown here is the meat sliding out of the shell, once out a little, pulling on it will often release the whole piece in tact.
 Some parts may come out crumbly, but no worries, it'll taste fine. I usually use them in crab cakes or h'orderves anyway. If making a crab cocktail (like a shrimp cocktail) you'll probably want to use the largest whole pieces that are created on top.


It's an expensive treat, so get it all out if you can. The tiny tips have meat too. Starting at the smallest end, use your rolling pin to roll out the meat. (works for lobster meat too).
Work through all the pieces the same way and your ready for any crab dish.______________________________________________________________________________
Crab Puffs-makes 8 nice puffs, served with a fruit salsa is great
½ pound of cooked crab meat (l/2 lb w/ shells, and about l/2-3/4cup of meat only)-see above for instructions on how to break down crab legs.
2 ounces cream cheese
l/3 cup Parmesan, grated
l/2 cup approximately of brie cheese, no white rind
salt and pepper, and ½ tbsp dill
16 wonton wrappers
2 tsp cornstarch mixed with 2 tsp cold water to seal edges
Oil for frying-canola or peanut oil works best
Filling the wonton wrappers:
Mix everything in a small food processor until smooth, place 1 wonton wrapper down, brush along the edges with cornstarch mixture, place small amount of mixture into center, top with 2nd wrapper. Make all wontons, then, heat oil on medium heat, ready when a chopstick starts to sizzle. Fry each on both sides until golden brown, and drain on a paper towel. Hope you like them.
This filling makes an amazing cold cracker topper as a great amus bouche too.
Dumplings-Steamed Dumplings (Dim Sum)


Ingredients:
1 boneless chicken thigh, remove fat, and cut into 6-8 pieces
1 Bratwurst (I prefer the Johnsonville bratwurst, they taste the best to me)
1 1/2 tbsp soy sauce
1/2 tbsp sherry
1/2 tbsp sesame oil
1/2 tbsp brown sugar
dash of pepper
1 1/2 tbsp cornstarch
10-15 won ton wrappers
Filling directions:
Note, you can fill these with anything you like, I like this recipe best.
 Cut off the fat from the chicken thigh, and cut it into 6-8 pieces and place into a Cuisinart or chopper.
Slit the bratwurst casing with a knife and remove inner meat, throw away the casing. Chop up the chicken and the bratwurst in the Cuisinart.


Remove into a bowl. Add all the other ingredients including the cornstarch.


Place about 1/2-1 tsp of filling onto a wrapper. Pinch edges together on both sides, and then sort of form a bag shape with it, squeezing a little at the top.

 Place into a steamer or shown here is a bamboo steamer. With these I like to use a damp clean cloth in the bottom. The steam gets through, and the dim sum are easy to remove.
 Continue making them and putting them in the steamer, trying to not have them touching one another. Steam in a wok or steaming pan for 5-8 minutes.
Serve with dipping sauce of your liking.
Many people serve this with just soy sauce.
I usually mix up some soy, sesame oil, sherry, balsamic vinegar, and ginger (often I use powder, but fresh slivers in this dip is wonderful.
I'm still working on making them prettier, but they taste wonderful, try them yourself, and let me know how you like them._____________________________________________________________________
Egg Rolls


Ingredients:
1 cup of cheese (I used a mixture of Romano, Parmesan, Fontina, and Mozzarella)
1 cup of carrots, julienned
2 celery stalks, julienned
2 broccoli stems, peeled, and julienned
1/2 of an orange bell pepper-roasted
1/4 cup left over meat (I used left over steak) can be omitted, up to you.
Egg roll wrappers
First you prepare all of your ingredients. Julienne the vegetables as shown below.
How to Julienne a carrot

Take your clean, peeled carrot, and cut off one small edge.
 Roll carrot over onto the flat edge.
 Slice into thin strips.
Slice Strips into 1/2 or 1/3, the long way into matchstick shapes, or long thin strips.
 Continue with the rest of the carrots. Done
------------------
How to julienne a shallot Take your shallot, and cut off the top and the bottom as shown. Make a small slit in the skin to make it easy to peel off.

They are often in 2 parts inside the peel, peel both parts, and you are ready to julienne.
 Slice into even strips.
 Then, cut those strips into 1/2 or 1/3 the long way to get long thin strips.
How to Peel and Julienne a Broccoli Stem
 First, use a paring knife to cut the larger rough stem that will clog your potato peeler.
 Continue all around it, cutting off the nubs.
 When done, it should look approximately like this.
 Next peel them with a potato peeler. The one on the left has been peeled and the one on the right still needs peeling.
 2 Done sections, ready to cut. You can use these so many ways.
Often I boil them in vegetable or chicken stock until tender, add to a thousand recipes. Today, we're making egg rolls, so using a julienne and stir frying them in olive oil.
 Slice into long wide strips, then slice those strips into 1/2 or 1/3 the long way to form long thin strips.
----------------------------------------
Roast the bell pepper


 Blacken all of the outer skin. Place wrapped up tight in foil for 5 minutes. It steams in there and makes the skin easy to remove.


 Slice into strips
And then cut in half.
Chop up the left over meat you chose into bite size strips or chunks.
Grate your cheese. Now all your ingredients are ready.
 Salt and pepper each set of vegetables you stir fry in olive oil. Do the batches separately so that they are all done perfectly. When almost done, remove to a bowl you've set aside to mix all the egg roll ingredients.

 If leftover oil in the pan, use it to start your next batch.
 Add more olive oil as needed.
 Don't worry about browning onions, the carmelization is wonderful flavor.
 Note the browned bits on the bottom on the pan, these are amazingly flavorful. Use your spatula to get all of the up and onto the food.
 Stir fry the celery until almost done.
 Stir fry the carrots until almost done.
 All the ingredients in the bowl. No need to cook the leftover meat, it's already cooked, as is the bell pepper.
 Mix it all together mixing well.

 Place a couple of tablespoons of your mixture into the center of the egg roll as shown.


Fold up the right side corner, pressing a little to seal it, and trying to make it tight. Then fold up the left corner the same way, kind of like an envelope.


If it tears, no worries, simply roll it again in another wrapper, even on top of the other wrapper will be fine.
 Fry Egg rolls over medium high heat-375-400 degrees F.
Use peanut oil or canola oil to handle the high frying temperature without burning. I used canola oil.
 Turn over during the cooking and continue cooking until golden brown, approximately 5 minutes per batch. Only do 4-5 at a time, (so that it doesn't cool down the oil too much and leave you with soggy egg rolls)
 Drain off excess oil on a paper towel. For a pretty presentation, try cutting them at an angle, and arrange on a platter.
______________________________________________________________________________
Fried Won tons
Ingredients:
20-25 won ton wrappers
20-25 won ton wrappers
½ cup cream cheese
2 shallots
l tbsp garlic
1/4-1/2 cup grated mozzarella
2 tbsp apple sauce,
salt & pepper-small amount, 1/2 tsp garlic powder, makes about 20-25 appetizers
1 egg to seal edges
Mix up the ingredients, and place a small amount into the won ton wrapper, brush with egg on edges, and seal. Then take the outer 2 edges and seal together as shown with egg.
1 egg to seal edges
Mix up the ingredients, and place a small amount into the won ton wrapper, brush with egg on edges, and seal. Then take the outer 2 edges and seal together as shown with egg.
Fry in Canola oil for a few minutes until golden brown.
_____________________________________________________________________________Fruit Appetizer, with fancy cheeses & sage honeycomb
This is so easy, use whatever items you like. I enjoy it spread out on a large plate, and making the cheeses in different
shapes. This appetizer has apple slices, raspberries, Ireland Dubliner cheese, Aged Cheddar cheese, Parmesan cheese triangles, and Sharp Cheddar, almonds and sage Honeycomb.
Sage Honeycomb-surprisingly good with fruit and cheeses. We went to a tasting menu at the Ritz Carlton one time, and they served their cheese course with honeycomb, so I tried it at home, and loved it.
_______________________________________________________
Grape leaves-stuffed
stuffed with a chicken/bratwurst mixture
Ingredients for filling:
1 boneless chicken thigh, remove fat, and cut into 6-8 pieces
1 Bratwurst (I prefer the Johnsonville bratwurst, they taste the best to me)
1 1/2 tbsp soy sauce
1/2 tbsp sherry
1/2 tbsp sesame oil
1/2 tbsp brown sugar
dash of pepper
1 1/2 tbsp cornstarch
Filling directions:
Note, you can fill these with anything you like, I like this recipe best.
Cut off the fat from the chicken thigh, and cut it into 6-8 pieces and place into a Cuisinart or chopper.
Slit the bratwurst casing with a knife and remove inner meat, throw away the casing. Chop up the chicken and the bratwurst in the Cuisinart. Remove into a bowl. Add all the other ingredients including the cornstarch. Wrap the grape leaves as you would an egg roll or or stuffed cabbage. Start by spreading out the leaf, and at the larger end of the leaf, place a small amount of the filling, approximately 2-3- tbsp.
Roll away from you one turn, and fold in the sides. Then continue rolling up until at the end. Place a cloth that has been rinsed under water and then wrung out a little onto the bamboo or steaming area. This will keep them from sticking when done. Then place the finished grape leaves into the steamer, seam sides down. Steam for approximately 5-6 minutes until firm. Enjoy with a dipping sauce. I find a heated apricot preserve very nice.
_______________________________________________________________
Guacamole
Ingredients:
3 avocados, preferably with thick skins
1/2 cup + 1 tbsp mayonnaise
1/4 tsp garlic powder
1/2 tsp salt
1/4 tsp fresh pepper
1/2 tsp Dill
1/2 tsp Dill
1 tsp avocado oil (optional)
2 tbsp Cholula hot sauce (optional), not too hot, or your favorite hot sauce
3 avocados, preferably with thick skins
1/2 cup + 1 tbsp mayonnaise
1/4 tsp garlic powder
1/2 tsp salt
1/4 tsp fresh pepper
1/2 tsp Dill
1/2 tsp Dill
1 tsp avocado oil (optional)
2 tbsp Cholula hot sauce (optional), not too hot, or your favorite hot sauce
Cut the avocados lengthwise all around using the pit as a guide. Twist the avocado a little and separate as shown.Parmesan Crackers-Good as accompaniment, a little too rich all by themselves.
Ingredients: 1 ¼ c fresh Parmesan cheese
1/8 tsp cayenne pepper
½ tsp salt
Black pepper
½ cup real butter
Blend above and then add
1 cup flour a little at a time. Use a small ½ size ice cream scooper, and then
flatter out a bit, bake for 25-26 minutes at 350 degrees.
_____________________________________________________________________Pizza, Gluten Free Pepperoni Pizza


Ingredients:
2 cups of Gluten free rice flour ( I like EnerG)
3/4 cup warm water (not cold, not hot, you want it for the yeast) *
1/2 tsp sugar
7/8 tsp salt
2 1/2 tsp butter *
7/8 tsp active dry yeast
I used a bread maker and used the dough mode. It takes 1 hour and 30 minutes. This dough is a little dry, so while the machine is mixing it, check on it many times, and pull back in any dough that is sticking to the side of the pan, and help it mix it a little. Remove from the machine, and place in a greased bowl.

 Cover with a cling wrap and a clean towel, and place in a warm part of your kitchen. Let rest for 1 hour. To be honest, I'm not sure this step makes a difference, as gluten free dough doesn't rise the same as regular dough. Cover your board in flour and begin to roll out into a rectangle or circle. All you're really trying to do is get the dough to be even across it and the thickness you desire. In this case, I was making mini pizzas so I made them a little thinner.
 I used a biscuit cutter and then a smaller one to make the mini pizza look like it had a crust like a larger one.
Next Make the pizza sauce:


Top with pizza sauce, a pinch of grated cheese.
(I used a mixture of 1 cup grated Romano,4 ounces of Fontina, 9 ounces of Mozzarella, and 1 cup of Parmesan-way too much cheese, probably because they were mini-but mix up the cheese, and put a pinch on each pizza.
 |
| Romano cheese |
 |
| Grated Romano cheese |
 |
| Grated Parmes |

 Fontina Cheese grated

Grated Mozzarella.
Add your favorite toppings. Shown here are 6 vegetarian pizzas and pepperoni pizzas.
I was tickled to find these mini pepperonis in the grocery store.
 I thought they were prettier before they were cooked, but tasty so I'm happy. This is my first gluten free cooking.
*A discussion on gluten free dough making. Well, I tried a mix from a health food store, and it was a total flop. Gluten free without the gluten in the regular flour works differently. So, then I went back to my usual pizza dough recipe and substituted the gluten free rice flour and it was so dry, it looked like it wouldn't work. So I adjusted the water amount and butter amount, and it came out well (already shown with these additions in the ingredients list). The crusts could be crunchier if you pre-bake them for about 3-4 minutes before you top them, then proceed like shown above and cook for 12-15 minutes more.
___________________________________________________________________________
Pizza Gluten Free Vegetarian Pizza, worked well

Ingredients for Dough:
2 cups of Gluten free rice flour ( I like EnerG)
3/4 cup warm water (not cold, not hot, you want it for the yeast) *
1/2 tsp sugar
7/8 tsp salt
2 1/2 tsp butter *
7/8 tsp active dry yeast
I used a bread maker and used the dough mode. It takes 1 hour and 30 minutes. This dough is a little dry, so while the machine is mixing it, check on it many times, and pull back in any dough that is sticking to the side of the pan, and help it mix it a little. Remove from the machine, and place in a greased bowl.
Cover with a cling wrap and a clean towel, and place in a warm part of your kitchen. Let rest for 1 hour. To be honest, I'm not sure this step makes a difference, as gluten free dough doesn't rise the same as regular dough. Cover your board in flour and begin to roll out into a rectangle or circle. All you're really trying to do is get the dough to be even across it and the thickness you desire. In this case, I was making mini pizzas so I made them a little thinner.I used a biscuit cutter and then a smaller one to make the mini pizza look like it had a crust like a larger one.Next Make the pizza sauce:
Top with pizza sauce, a pinch of grated cheese.
(I used a mixture of 1 cup grated Romano,4 ounces of Fontina, 9 ounces of Mozzarella, and 1 cup of Parmesan-way too much cheese, probably because they were mini-but mix up the cheese, and put a pinch on each pizza.
|
| Romano cheese |
|
| Grated Romano cheese |
|
| Grated Parmesan |
Fontina Cheese gratedGrated Mozzarella.
Add your favorite toppings. Shown here are 6 vegetarian pizzas and 1 pepperoni on the edge.
See below for how to prepare the vegetables.
 I thought they were prettier before they were cooked, but tasty so I'm happy. This is my first gluten free cooking.
*A discussion on gluten free dough making. Well, I tried a mix from a health food store, and it was a total flop. Gluten free without the gluten in the regular flour works differently. So, then I went back to my usual pizza dough recipe and substituted the gluten free rice flour and it was so dry, it looked like it wouldn't work. So I adjusted the water amount and butter amount, and it came out well (already shown with these additions in the ingredients list). The crusts could be crunchier if you pre-bake them for about 3-4 minutes before you top them, then proceed like shown above and cook for 12-15 minutes more.
How to prepare the vegetables:
Ingredients:1 beet, peeled and diced
1 baby bok choy
1/4 of large sweet onion, diced
l ear of corn
l small portabello mushroom
salt and pepper
 Firstly, if you don't want red hands, I suggest either gloves or paper towels between you and the beet, and I cut it on a separate board so it doesn't stain my butcher block.
Use a potato peeler to peel the outside of the beet. I leave the greens on while doing this to help you hold onto it. Then cut off the greens (they are edible I do believe, but didn't use them in this recipe).
  |
| Peel and dice the Beet |
 Place 1 can of vegetable broth in a sauce pan over medium heat.
  Add the diced beets to the broth and cook until they are soft and to your liking.
 Use a slotted spoon and remove the beets to a medium size bowl.
 Next, dice up the bok choy. Here I tend to separate the greens from the whitish stem as they cook in a different amount of time. Heat up a fry pan over medium heat, add olive oil to the hot pan. Stir fry the vegetables separately for best results adding salt and pepper to each batch. You can tell when each is perfectly done this way.
 Sauteing the onions. When soft and caramelizing, remove to the medium size bowl with the beets. By the way, I learned the other day, that when you want to caramelize and get all those nice browned bits off the bottom of the pan, you should not use not-stick pans as they "don't stick", shown my old way here.Cut corn off the cob by standing it on end and cutting off with a sharp knife.
 Saute the corn kernels.
 Saute the mushrooms.
Not shown, but saute the bok choy white stem part for a few seconds, add the greens, a few more minutes.
 Mix the vegetables together. Not only is it a pretty mix, but the more colorful the vegetables, the better for you it is.Mixed up and ready to top your pizzas.
____________________________________________________________________________
Prosciutto wrapped around brie and orange supremes
 Remove the white rind. Don't throw it away, but the cheese without it is better for this purpose.
 Brie and Prosciutto sliced ultra thin.
 Orange Supremes-instructions below
 spread out 1 piece of proscuitto and place 1 orange supreme and a rectangle of brie cheese on the short end.
 Roll up, done.
 Make the rest of them for your platter.Serve with a few extra supremes for garnish.
How to make Orange Supremes
These are beautiful slices of oranges that have no rind or membrane remaining.
They are wonderful atop curry dishes, orange sauces, or served alone.


This is accomplished by cutting off the top and bottom of the orange just past the peel.
Set it on one of the flat sides on your cutting surface.


Then,using your paring knife, you cut away the remaining peel in strips from top to bottom until all the peel is removed.
Don't worry if you see additional white membrane or peel, simply cut it away before the next step.


Look at the sections
in the orange, holding the orange, cut down the edge of the interior membrane and when you reach the bottom of the section, angle the knife to the right and slice out the supreme into a bowl.


Continue until the entire orange is done. Remember you can use the rest of the orange too, give it a quick squeeze and use the juices in your recipe.

___________________________________________________________________________
Shrimp cocktail1/2 pound of 16 count per pound shrimp
1 stalk of celery, peeled and chopped
2 Roma tomatoes, chopped
6-8 tbsp of your favorite cocktail sauce.
Mix up the sauce and tomatoes, place in a bowl and top with shrimp. Serve with lemon or lime.

______________________________________________________
Shrimp Cocktail in Phyllo


Ingredients:
1/2 pound of shrimp ( 8 large shrimp)-chopped into bite size pieces
1/3 cup of chopped sweet onion, chopped
1/4 cup of celery-chopped
1/4 tsp salt
Pepper, few turns
1 tbsp BBQ sauce
2 tbsp of cocktail sauce
2 tbsp melted butter
Phyllo dough (from grocery freezer section)
 Mix together all the ingredients except the melted butter and Phyllo.Prepare a baking sheet with either a silpat (silicone baking sheet), my favorite, or spray with a cooking spray.Next you will need a basting brush, 2-4 tbsp of butter or margarine and a package of Phyllo dough from your grocery freezer section. These are thin crispy pastry sheets.This is the pyllo dough. Keep the portion of the phyllo that you aren't using at this moment rolled up, or covered with a clean damp towel. I like to use a pizza cutter to cut my strips, it works best, but a knife is fine too. Cut a strip, the short way approximately 2-3 inches wide, but your choice, it'll work no matter the size. Cut through the entire stack, it'll be easier.
Next, take a teaspoon-tablespoon of the filling and place at the end of the strip.
Lifting up 2-3 thin sheets, start to fold up like you'd fold a flag. Take 1 corner up and make a triangle, push down a little to flatten the filling.Continue to fold up, making a triangle each time as you go.Almost there, don't worry if you have a square left over that isn't a triangle, simply fold it into place, the butter on top will do the rest.Folded up and ready for the baking sheet. Baste with butter, and top with your favorite seasonings. I used sesame seeds and pepper on this one.These are not the shrimp ones, but identical in appearance in every way but the herb on top. Oops, the family ate them before I could get a picture of them this time.
Spatzle-a dumpling, a Hungarian treat
Ingredients:
2 eggs slightly stirred
1/4 cup milk
1 cup flour (to be authentic, use cream of wheat)
dash of pepper
1/2 tsp salt
2 tsp of rosemary
1 whole head of roasted garlic (see chicken pot pie recipe for how to roast garlic)
First roast the garlic as described on the chicken pot pie recipe, then mix all ingredients together to make your spatzle dough. This can be used atop chicken stews, but I like it best with melted butter and salt as a side dish to a nice meat dish.


This is a spatzle maker, it will create small noodles in your boiling water.
 Although I love having the spatzle maker, I prefer how my mom taught me, which was to put the dough on the board and push off with a butter knife into the salted water. I can then control their size, which I prefer 3 inches long and about 1/2 an inch wide. Boil in salted water for about 5 minutes and then drain, put back in the pan with a few tablespoons of butter. These are the ones created with the spatzle maker. I will later put up the larger ones which I prefer. Still Delicious, I just like a little more dumpling in each bite.
________________________________________________________________________
Super Easy Olive Dip
Take 1/2 cup mayonnaise
1/2 cup sour cream
1 small can of chopped black olives
3 kalamata olives-chopped (or your favorite fancy olive-there for intensity of flavor)
a sprinkle of salt and pepper, and 1/4 tsp dill
mix up and put on your favorite crackers-I like Ritz crackers for this dip. Also good with the Parmesan crackers recipe on this site.
___________________________________________________________________
Vegetable Tower
Ingredients:
1 broccoli stem, peeled, chopped, boiled until done, then blanched in a cold water bath
1/2 tomato, Roma copped fine
yellow squash chopped fine
1/8-1/4 cup Parmesan
salt and pepper,
garlic powder
dill
place in a square mold, a ring mold one layer at a time, with Parmesan in between the layers. Press down a little and then remove mold.
Amuse Bouche-tiny 1 bite appetizers
_______________________________________
Recipes on this page include:
Butternut Squash Consomme
Crab Puffs
Proscuitto wrapped around brie and orange supremes
Steamed dumplings , dim sum
Proscuitto wrapped around brie and orange supremes
Steamed dumplings , dim sum
Super Easy Olive Dip
Sushi
Butternut Squash Consomme, super healthy and super easy.
 I like to serve this in Saki cups like these. A great amus bouche (and vegan too)
 Peel and cube 1/2 of a small butternut squash. Boil in 1 can of vegetable stock (fat free and salt free) for 4-5 minutes until soft enough to mash. Remove the cooked pieces with a slotted spoon and save for use in other recipes, and use the liquid for consomme (*just strain with a fine mesh strainer {picture below}, and serve warm-so so good-a vegan treat too) I prefer to use a Cuisinart to blend up, but you can mash by hand if you prefer, just get it smooth, and no lumps if by hand.
  Pour through a Fine Mesh strainer for remaining liquid
 to become a pure consomme. If you don't have one, it's still good as it is.
* Butternut squash Consomme-great stuff, and great vegan treat too. See above recipe for how this is made.______________________________________________________________
Crab Puffs-makes 8 nice puffs, served with a fruit salsa is great
½ pound of cooked crab meat (l/2 lb w/ shells, and about l/2-3/4cup of meat only)
2 ounces cream cheese
l/3 cup Parmesan, grated
l/2 cup approximately of brie cheese, no white rind
salt and pepper, and ½ tbsp dill
16 won ton wrappers
2 tsp cornstarch mixed with 2 tsp cold water to seal edges
Oil for frying-canola or peanut oil works best
Filling the won ton wrappers:
Mix everything in a small food processor until smooth, place 1 won ton wrapper down, brush along the edges with cornstarch mixture, place small amount of mixture into center, top with 2nd wrapper. Make all won tons, then, heat oil on medium heat, ready when a chopstick starts to sizzle. Fry each on both sides until golden brown, and drain on a paper towel. Hope you like them.
___________________________________________________________________
Prosciutto wrapped around brie and orange supremesRemove the white rind. Don't throw it away, but the cheese without it is better for this purpose.Brie and Prosciutto sliced ultra thin.Orange Supremes-instructions belowspread out 1 piece of proscuitto and place 1 orange supreme and a rectangle of brie cheese on the short end.Roll up, done.Make the rest of them for your platter.Serve with a few extra supremes for garnish.How to make Orange Supremes
These are beautiful slices of oranges that have no rind or membrane remaining.
They are wonderful atop curry dishes, orange sauces, or served alone.
This is accomplished by cutting off the top and bottom of the orange just past the peel.
Set it on one of the flat sides on your cutting surface.
Then,using your paring knife, you cut away the remaining peel in strips from top to bottom until all the peel is removed.
Don't worry if you see additional white membrane or peel, simply cut it away before the next step.
Look at the sections
in the orange, holding the orange, cut down the edge of the interior membrane and when you reach the bottom of the section, angle the knife to the right and slice out the supreme into a bowl.
Continue until the entire orange is done. Remember you can use the rest of the orange too, give it a quick squeeze and use the juices in your recipe.
______________________________________________________________
Steamed Dumplings (Dim Sum)Ingredients:
1 boneless chicken thigh, remove fat, and cut into 6-8 pieces
1 Bratwurst (I prefer the Johnsonville bratwurst, they taste the best to me)
1 1/2 tbsp soy sauce
1/2 tbsp sherry
1/2 tbsp sesame oil
1/2 tbsp brown sugar
dash of pepper
1 1/2 tbsp cornstarch
10-15 won ton wrappers
Filling directions:
Note, you can fill these with anything you like, I like this recipe best.
Cut off the fat from the chicken thigh, and cut it into 6-8 pieces and place into a Cuisinart or chopper. Slit the bratwurst casing with a knife and remove inner meat, throw away the casing. Chop up the chicken and the bratwurst in the Cuisinart.
Remove into a bowl. Add all the other ingredients including the cornstarch.
Place about 1/2-1 tsp of filling onto a wrapper. Pinch edges together on both sides, and then sort of form a bag shape with it, squeezing a little at the top.
Place into a steamer or shown here is a bamboo steamer. With these I like to use a damp clean cloth in the bottom. The steam gets through, and the dim sum are easy to remove.Continue making them and putting them in the steamer, trying to not have them touching one another. Steam in a wok or steaming pan for 5-8 minutes.Serve with dipping sauce of your liking.
Many people serve this with just soy sauce.
I usually mix up some soy, sesame oil, sherry, balsamic vinegar, and ginger (often I use powder, but fresh slivers in this dip is wonderful.
I'm still working on making them prettier, but they taste wonderful, try them yourself, and let me know how you like them.____________________________________________________
Super Easy Olive Dip
Take 1/2 cup mayonnaise
1/2 cup sour cream
1 small can of chopped black olives
3 kalamata olives-chopped (or your favorite fancy olive-there for intensity of flavor)
a sprinkle of salt and pepper, and 1/4 tsp dill
mix up and put on your favorite crackers-I like Ritz crackers for this dip. Also good with the Parmesan crackers recipe on this site.
_____________________________________________________________________
Sushi
I just finished my first try at sushi. I'm very proud of them. I saw Chef Marimoto from the food channel do a similar one (much better though) with the same design. I think for my first try they came out pretty well. I served them with soy sauce & a creamy garlic sauce-not that typical a sauce, but sounded good to us. They are Nori (seaweed wrap), filled with rice, broccoli stem and carrot cut into long thin strips (both barely boiled in water, then blanched in an ice bath). It was fun to do. They were done by first using just rice, (or rice with some rice wine vinegar to season) wrapped into the Nori wrapper. Using a bamboo mat or even cling wrap will work. Then carefully slice into quarters the long way. Now start a new wrapper, place 2 of the long ¼’s upside down with the nori side toward you. Then in the center, place your long thin vegetables and then the other 2 ¼’s into it with the rice towards you now. Then roll up in the mat or cling wrap, trying to center the vegetables in the center to create somewhat of a flower look. I love the way these look. Next time, I may add some fish to them, probably cooked shellfish, as that’s my favorite.
Creamy garlic sauce- make a rue (butter and flour thickener) with ¼ cup of butter or margarine, and ¼ cup flour, add 4 cloves of garlic (best if roasted with a little olive oil in the oven for 35minutes on 350 degrees F), and ½ cup chicken stock, stir until smooth and thickened. Add 1/3-1/2 cup cream, salt, pepper, garlic powder, a little dried mustard and nutmeg.
Sushi -If you don't like raw fish, you can still love sushi
_______________________________________________________________________________